|
|


Disclaimer: Exercising reasonable safety
precautions when performing the steps described
in this article are the responsibility of the
individuals building the background.
Dramaticaquascapes.com is not responsible for
personal injury or property damage as a result of
following steps outlined in this article.
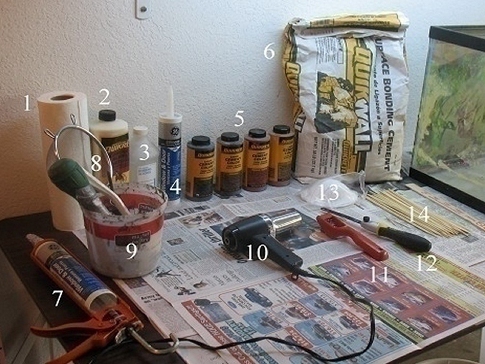
Tools and Supplies (Reference above picture)
1. Paper towel
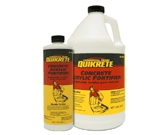
2. QUIKRETE Concrete Acrylic Fortifier (Click photo to the right for more product info)
3. Rubbing Alcohol
4. Tube of aquarium safe silicone. Marineland markets a 10 oz tube of Aquarium Sealant designed for caulking guns.
5. Quikrete brand Cement Color(s). Choices are Red, Brown, Buff, Charcoal and Terra Cotta
6. Quikrete Quikwall Surface Bonding Cement or Quikrete Glass Block Mortar (no reinforcing fibers to sift out)
7. Standard caulking gun for the silicone tube.
8. Kitchen sieve to sift out small fiberglass strands from the cement. (optional)
9. One to three empty plastic containers for mixing the acrylic liquid and cement (preferably round instead of square) Use multiple containers for multiple colors.
10. Commercial or hobby heat gun.
11. Stanley surform shaver tool
12. Stanley FatMax hacksaw handle and blade
13. Paper dust masks for use when sifting fiberglass from cement.
14. Bamboo skewers - for securing styrofoam while silicone cures. (optional)
Additional supplies not shown in the above picture:
15. Masking tape and old newspaper.
16. Toothpicks (same solution as skewers, but for smaller applications)
17. Single-sided razor blades for cleaning glass.
18. Cellophane (sandwich wrap) to protect the inside front glass from cement spatter.
19. 2 - 5 gallon bucket with lid for sifted cement mix.
20. A glass aquarium of any size
21. 1 (4' x 8') pink sheet of Extruded Polystyrene Foam. 1" to 1 ½" thick work for most projects. A good guideline is the larger the background, the thicker the styrofoam
22. Can of Black enamel spray paint
23. Two or three 1" to 2" disposable paint brushes.
1. Paper towel
2. QUIKRETE Concrete Acrylic Fortifier (Click photo to the right for more product info)
3. Rubbing Alcohol
4. Tube of aquarium safe silicone. Marineland markets a 10 oz tube of Aquarium Sealant designed for caulking guns.
5. Quikrete brand Cement Color(s). Choices are Red, Brown, Buff, Charcoal and Terra Cotta
6. Quikrete Quikwall Surface Bonding Cement or Quikrete Glass Block Mortar (no reinforcing fibers to sift out)
7. Standard caulking gun for the silicone tube.
8. Kitchen sieve to sift out small fiberglass strands from the cement. (optional)
9. One to three empty plastic containers for mixing the acrylic liquid and cement (preferably round instead of square) Use multiple containers for multiple colors.
10. Commercial or hobby heat gun.
11. Stanley surform shaver tool
12. Stanley FatMax hacksaw handle and blade
13. Paper dust masks for use when sifting fiberglass from cement.
14. Bamboo skewers - for securing styrofoam while silicone cures. (optional)
Additional supplies not shown in the above picture:
15. Masking tape and old newspaper.
16. Toothpicks (same solution as skewers, but for smaller applications)
17. Single-sided razor blades for cleaning glass.
18. Cellophane (sandwich wrap) to protect the inside front glass from cement spatter.
19. 2 - 5 gallon bucket with lid for sifted cement mix.
20. A glass aquarium of any size
21. 1 (4' x 8') pink sheet of Extruded Polystyrene Foam. 1" to 1 ½" thick work for most projects. A good guideline is the larger the background, the thicker the styrofoam
22. Can of Black enamel spray paint
23. Two or three 1" to 2" disposable paint brushes.
Introduction
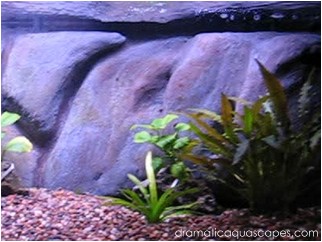
Why go to all the trouble of building a custom aquarium background when natural rocks and driftwood make a perfectly nice aquascape? My own motivation was to attempt to achieve something unique and a little more dramatic than standard fare. The sample images included in this article were taken during background builds of a few different projects, but the steps they illustrate apply regardless of the size of the aquarium you are working with. Background construction of the 20 gallon aquarium on the title page collectively took about 6 hours over a three day period.
The Basic Idea
We're cutting and shaping styrofoam to look like real rocks, then gluing in place with aquarium safe silicon and covering with colored cement. The end result weighs a fraction of real rock and can look simply amazing.
Are the Materials Safe for My Fish?
The 20 gallon aquarium above has been home for several freshwater tropical fish including Neon Tetras, Zebra Loaches, Spotted Cory Catfish, Fancy Guppies, Ruby Red Cichlids, German Blue Rams and a Beta with no pH buffers and no health issues.
Work Area / Safety Precautions
Your work area needs to be a place with good ventilation where you can make a bit of a mess. Consider use of a paper dust mask when preparing cement. The process of cutting and shaping the styrofoam produces quite a lot of pink sawdust. Prolonged cement to skin exposure should be avoided so either wear rubber gloves or periodically wash any cement off your hands.
Tools and Supplies
Before you start, here's a list of needed supplies. The list may seem a little daunting at first, but you may find you have some of the more common items already at home. The majority of the hardware store type items below can be found at Home Depot. Many of the other items can be found at your local grocery store.
If you're looking for step-by-step instructions on how to create your own custom
aquarium background, the article below will walk you through the build process
from start to finish. Before you dive in and start building, I suggest you take the
time to read the article through at least once before getting started to help
insure a successful and happy outcome. If you still have questions after
reading the article, please feel free to post in the "background build questions"
section in the community forums and I'll do my best to answer your questions.
Thanks for your interest!
How to Build Your Own Custom Aquarium Background
By Glenn Minor
By Glenn Minor